21 Aug 8 Science Experiments Parents Can Enjoy with Their Kids
Science experiments can be a fantastic way for parents to bond with their kids while fostering their curiosity and love for learning.
Summer holidays can be very boring for kids if parents keep them indoors day to day. Therefore, on rainy days, parents can set up some science experiments to help kids play and understand some basic principles of physics and chemistry.
The importance of science experiments for kids
- Cultivate curiosity: Science experiments spark children’s curiosity and encourage them to question the world around them.
- Hands-on learning: Experiments provide a hands-on learning experience that goes beyond reading or listening to lectures. By actively engaging with materials and concepts, children develop a deeper understanding of scientific principles.
- Critical thinking skills: Science experiments require observation, analysis, and problem-solving. Through this process, kids develop critical thinking skills that they can apply not only in science but also in other subjects and real-life situations.
- Promote creativity: Encouraging kids to design and conduct their experiments fosters creativity and innovation. They learn to think outside the box and come up with unique solutions to scientific questions.
- Enhance academic performance: Practicing science experiments can improve overall academic performance. It strengthens their understanding of scientific concepts, which can positively impact their performance in science-related subjects.
- Boost confidence and self-esteem: Successfully conducting science experiments gives children a sense of accomplishment and boosts their self-esteem.
- Real-world application: Science experiments often relate to real-life situations and phenomena, making learning more relevant and practical. Children can see how science plays a role in everyday life.
- Cultivate a love for science: Early exposure to enjoyable and engaging science experiments can instill a lifelong passion for science, inspiring kids to pursue careers in STEM fields.
8 Science Experiments Parents Can Enjoy with Their Kids
Parents should spend time with their children because the most precious present we give our children is not toys but our time.
Children will enjoy spending hours with us researching and trying new things. Here are 8 Science experiments parents can enjoy with their kids:
1.Floating Fish

- All we need are a marker, a shiny flat surface (a glass plate or tray), and of course a little water.
- You and your kids draw some fish on the bottom of a glass plate or tray with a dry-erase marker. Make sure all the lines are connected and let dry for a minute or two.
- When you pour water over the previous drawing, you will see it slowly rise from the surface. Observe how the fish shapes move and float in the water. They may follow the water currents or stay in one place, depending on the water’s movement and the shape of the fish.
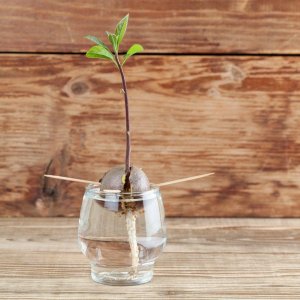
2. Grow an Avocado Tree
Supplies Needed:
- Ripe avocado fruit
- Toothpicks or wooden skewers
- Glass or jar
- Pot with drainage holes (size depends on the seedling’s growth)
- Potting soil mix
- Sunny location
Steps:
- Remove the seed: Cut open a ripe avocado and carefully remove the large seed (pit) from the center. Wash off any flesh or residue from the seed, but avoid removing the brown outer skin.
- Prepare the seed: Hold the seed with the pointed end facing up and the rounded end down. The pointed end will sprout the roots, and the rounded end will develop the stem and leaves.
- Insert toothpicks: To suspend the seed over water, stick three to four toothpicks or wooden skewers into the seed’s sides at a slight downward angle. These toothpicks will rest on the rim of a glass or jar, allowing the bottom half of the seed to be submerged in water.
- Place in water: Fill a glass or jar with water, making sure the bottom half of the seed is immersed. The top half with the toothpicks should be above the water level.
- Wait for sprouting: Place the glass or jar with the avocado seed in a warm and sunny spot, like a windowsill. Change the water regularly to keep it fresh and clean.
- Wait for roots and stem: It may take a few weeks for the seed to crack open and for a taproot to emerge from the bottom. You should also see a stem starting to grow from the top.
- Plant the sprouted seed: Once the taproot is a few inches long, and the stem is about 6-7 inches tall, it’s time to plant the sprouted seed in a pot with well-draining soil. Fill the pot with potting soil, leaving enough space for the seedling.
- Planting: Make a small hole in the soil and gently place the avocado seedling into it. Cover the seed with soil, leaving the top half of the seed exposed.
- Water and care: Water the newly planted seedling thoroughly and place it in a sunny location. Avocado trees prefer regular watering but don’t like soggy soil, so make sure the pot has proper drainage. Also, keep the plant away from cold drafts.
- Watch it grow: With proper care and patience, your avocado tree will start growing into a beautiful houseplant. As it grows, you may need to repot it into a larger container to accommodate its size.
3. Milk Bottle Xylophone

Steps:
- Gather the milk bottles: Collect 6 plastic milk bottles.
- Fill the bottles with water: Fill each milk bottle with a different amount of water. The amount of water will affect the pitch of the sound. The more water in the bottle, the lower the pitch; the less water, the higher the pitch.
- Add food coloring (optional): To make the milk bottle xylophone visually appealing, you can add a few drops of food coloring to each bottle. This will give each bottle a different color, making it more enjoyable for kids.
- Decorate (optional): Let the kids decorate the bottles with permanent markers or stickers to add a personal touch to their xylophone.
- Arrange the bottles: Line up the bottles in ascending or descending order based on their pitch. The one with the highest pitch should have the least amount of water, and the one with the lowest pitch should have the most water.
- Play the xylophone: Now, your milk bottle xylophone is ready to be played! Hand the kids wooden sticks or mallets to strike the bottles and create musical notes.
- Experiment with different sounds: Encourage the kids to experiment with different water levels in the bottles to create various sounds and melodies. They can play simple tunes or try to replicate familiar songs.
- Explore rhythm and beats: While playing the xylophone, kids can also explore rhythm and beats. You can create a basic rhythm pattern and have them repeat it or create their own unique rhythms.
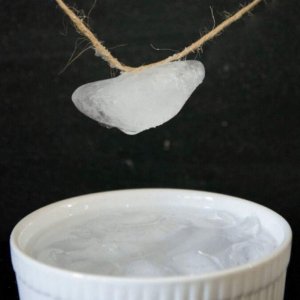
4. Sticky Ice
Steps:
Create different mixtures: In separate bowls or cups, prepare three different mixtures:
- Ice only: Fill one container with plain ice cubes or crushed ice.
- Ice and salt mixture: Fill another container with ice cubes or crushed ice and sprinkle a generous amount of salt over it. Mix the ice and salt together.
- Ice and sugar mixture: Fill a third container with ice cubes or crushed ice and sprinkle a generous amount of sugar over it. Mix the ice and sugar together.
Observe and compare: Allow the containers to sit for a few minutes and observe what happens to each mixture. You may notice some interesting changes taking place.
Explanation:
Ice and salt mixture: Adding salt to ice lowers its freezing point, causing the ice to melt. The process of melting and refreezing creates a slushy mixture, which might feel sticky due to the presence of water and salt.
Challenge your child to lift up an ice cube with just a piece of string. The ice cube absorbs the heat from the water around it, making the water cold enough to re-freeze around the string.
Ice and sugar mixture: Sugar doesn’t lower the freezing point of ice as salt does, so the ice will not melt as quickly. Instead, you might observe a slightly wet surface as the sugar dissolves in the ice.
5. Leaf Breathing
Children can see the leaves “breathe” when parents show them the bubbles that emerge from the leaves when they dip a leaf in water.
You can also teach your child about photosynthesis by placing plants in different sun light to see each plant growth in variety ways.

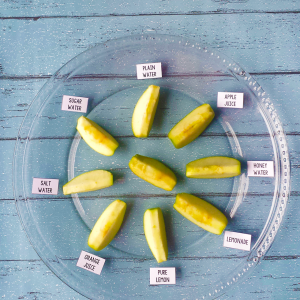
6. Apple Oxidation
Tell your child that different juices will help speed up or prevent the oxidation of an apple!
Parents can slice up an apple, and let each slice soak in a different liquid such as plain water, salt water, sugar water, honey water, lemon juice, orange juice, pineapple juice, or apple juice ... Then you and your kids take them out, lay them on a tray, and check the brownness after three minutes, 5 minutes and so on.
Different juices can have varying effects on apple oxidation, depending on their acidity and other properties.
7. Magic Milk
Fill a shallow dish with milk and add drops of different food coloring in various spots. Dip a cotton swab in dish soap and touch it gently to the milk surface. Watch as the colors swirl and dance due to the surface tension and chemical interactions.

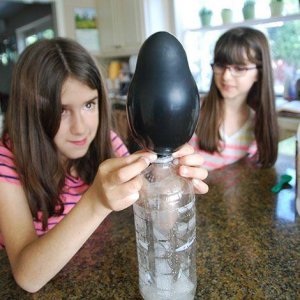
8. Self-Inflating Balloon
The “Self-Inflating Balloon” experiment is a fun and straightforward science activity that reflects a chemical reaction that produces gas, causing a balloon to inflate without using your breath or a pump.
Firstly you put baking soda in an empty bottle and vinegar in a balloon. Next, you attach the balloon to the bottle. Then you hold the bottle with one hand, and with the other, lift the balloon, allowing the vinegar to flow into the bottle. The vinegar will react with the baking soda, producing carbon dioxide gas, which will inflate the balloon.
Conclusion
For children, playing with their parents and discovering from experiments is always exciting!
But we remember to prioritize safety during any experiment. It is better always to supervise closely, and avoid using hazardous materials or tools.
I hope you and your kids have fun exploring together and encouraging kids’ curiosity and creativity!